Showing posts with label Versailles. Show all posts

Monday, November 14, 2016

Another Recycled Lamp


When we purchased our house, the owners left several lamps in the pitifully staged house. Seriously, there were a couple of TV trays (like from the 1960s) with lamps and timers in the rooms that did not have overhead lighting. I redid the mid-century lamp from the basement. Check it out: HERE

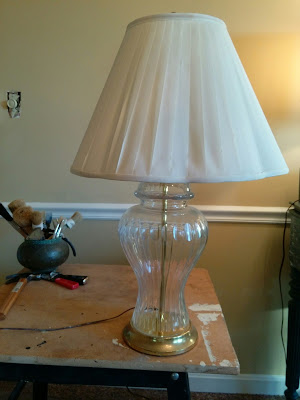
 And I wanted to see what I could do with two of these:


For about five minutes in the 1970's I thought these glass lamps were interesting, but I always felt like there needed to be something inside them. 

Seashells in a beach house ... maybe. Silk flowers ... NEVER.

The shape reminded me of blue and white ginger jar lamps...which I like. Since there is no way in the world I could ever paint something like that myself, I thought I would decoupage with cocktail napkins. It seemed to be a simple, interesting technique. 

I headed to Tuesday Morning (one of my favorite places) looking for inspiration.


I ended up with a package of guest towels, $2.99 for 16. I liked the repeat pattern and the fact that there were only 2 colors. 


I got my sharp little scissors and put on Netflix while I snipped away. Once the patterns were cut out, all I had to do was carefully peel away the two white layers of paper, leaving me with a very thin layer of paper with the pattern. I had watched some videos about using cocktail napkins for decoupage. Really pretty simple.

While I carefully practiced the scissor skills I learned in elementary school, I watched anther episode of REIGN.


Next I reached for the Annie Sloan Chalk Paint that sticks to glass.
I chose Versailles, a pale, grayish green, and applied 2 coats.


I used the Annie Sloan decoupage medium, because her stuff is designed for the non-professional crowd. 


All I had to do was paint the medium on the spot where I wanted to apply my paper, stick it on, and cover it with a thin layer of the medium. I then waited 20 minutes for the medium to dry and added a second coat. The instructions say to use 4 - 5 coats for best results. Super easy. I covered the entire piece with the medium so the finish would be the same. This product is an all-in-one glue and glaze.


It "popped" a little more than I wanted, so I used the Annie Sloan dark wax to tone it down. Because of the glazed surface from the decoupage medium, I did not start with the clear wax. I could not find any instructions for using dark wax with the decoupage medium, so I just made it up as I went along. I turned out fine.

(Forgot to take a picture of the dark wax application)


The lamp was looking not right, so I decided to add gilding wax. I started with my finger and then got a Q-tip because the areas were small. The more I applied, the better I liked it. It was a little tedious, so I put on another episode of REIGN. Then it hit me - I was recreating the costumes of the royal characters with their gold-threaded damask!


Do you see it, too??


One lamp down, one to go.

 Or should I try something else? Please let me know what you think!


The lamp next to gilt-edged poetry books from the 19th century that belonged to my great-grandfather (the books, not the century).


While the contractor is tearing down walls in the next room, I was hanging the pictures to make a little vignette. Hubby has always said I want to hang the pictures before the walls are even up. He is literally correct this time. 


Monday, October 17, 2016

The Mirror with a French Touch


Think I rescued this from an old chateau? I'll tell you the real story.


My mom rescued the mirror from a church yard sale ... for all of $1. Notice the glass around the mirror. Not sure why.  And whatever glue they used to stick the mirror to the glass has caused some damage to the reflection. The wood trim was originally that strangely patterned brown stain you see at the bottom.  The white is just where I cleaned my brush off on the wood. What is it about ugly stuff that makes me want to start with the graffiti?

My thought was to use Efex bendable furniture molding to transform this from the 1970's to the 1770's. I drove out to the Empty Nest in Warrenton, VA. They are my closest Efex dealer and still about an hour away. But the drive was worth it to meet Janet and her wonderful staff. I have been cyber-stalking them for months and knew they would be able to give me the inspiration I needed. They took the moldings out of the packaging to let me play with them and even let me cut a frame into pieces before I paid for it! 

I ended up with two Efex frames (F15), two cans of Annie Sloan Chalk Paint in French Linen and Versailles, and the seed of a plan. 


The first step was to paint the glass with ASCP in Versailles. Yes, you can paint glass with this paint. Amazing, huh?


The second step was to paint the wood with ASCP in French Linen. 


The next morning all was dry and ready for some fun. Here is the frame before I deconstructed it.


This was my original plan, but I thought I better make sure. Looking pretty good. But what if I put more of the decoration at the top?


I'm liking this better. But it feels a little top-heavy.


 Now we're talkin'.

But the short pieces are not doing it for me. My original thought had been to cut apart the four sides, but I decide to cut the short sides in two also, leaving me with 2 large pieces and 4 small pieces from each frame. 


I think it is best to stretch the material and then make the cut with scissors.


You can see how each of the short sides can become two pieces that are mirror reflections. The edges are a bit blunt, but that is easily fixed with the scissors.


You can see the little crumbs that I trimmed away.


After I finish all the cuts, I have four pairs of leaves and four large pieces for the top, bottom and 2 sides.


I first put all four of one shape together, but it reminds me of a bad '80s hairdo.


Alternating is definitely much preferable.


Time to glue. There are loads of tutorials out there, but the short story is: trace the shape with a pencil, apply contact cement to the back of the Efex and where you are going to attach it, let dry 15 - 20 minutes, press the piece on. Done.


Next I apply a second coat of ASCP in French Linen, covering the moldings too.


Here's the truth -Not real sure what I'm going to do next. So I put a touch of ASCP in Versailles on the molding and apply Annie Sloan Clear Wax.  Hmm. Now what?


 I want it to look really old, so I start with some Annie Sloan Dark Wax and rub it back as I go. Again, there are lots of videos on how to apply the clear and dark waxes. Watch those if this is new to you.

 I'm liking the look so I keep going, covering both the French Linen and the Versailles, adding extra in corners and around the molding, like hundreds of years of dust and grime are covering this thing.


Then I apply gilding wax to the moldings. This is getting fun!


And the close-up.


 It turned out even better than I imagined.

I am thinking about using it at the top of the stairs. Or maybe near the front door.