Friday, October 28, 2016

Pots of Sedum


Last week I was at Costco. I know you are surprised! They had packets of 3 sedum plants for $18. Now they were in nice decorative pots, but that seemed a little high to me. I guess know I am cheap. I think sedum in pots is hot right now??? So I thought it might be fun to share a project I did last May.

For some reason it always falls to me to come up with a gift idea for the children at church to make for Mother's Day. As a mother of four, I have been the recipient of much trash many lovely items made by children's hands. I know which ones I liked and which ones I threw away as soon as the children were in bed. 

Searching for an idea this year, I went to the garden section at Home Depot looking for inspiration. My criteria - cheap, easy enough for a 3-year-old to do, and not trash. I bought a few dozen 4" terracotta pots for 79 cents each and a "sedum tile" (1' x 2') for $19.99. 

I had never seen sedum tile before. It is a mat of the little succulents growing on coco fibers that you can just slap down in your garden. It came in 1' x 1' and 1' x 2'. 

Fortunately the weather was nice on Mother's Day, so we took the children outside. The teachers had the children scribble on personalize the pots with crayons and then add some of the free compost I had gotten from Arlington County. (I love that service! They also give away free trees once a year.)

My job was to hack off clumps of the sedum the children then "planted" in their pots. We watered and called it done.


 I liked them so much I made myself a few. With the pot and the plant, they cost about $1.50 each. Some of the crap craft projects cost that much.


Planted last spring, you can already see the white calcium forming on the side of the pot. I love that!


The house has a "greenhouse window" behind the sink. The window is not long for this world, but I decorated in the meantime. I also have a succulent from our very first house and my Mother's Day hydrangea from last year that fought hard to survive when I was gone for 3 weeks and it received not a drop of water. 


A little cluttery, but it still makes me smile.

If you were one of the mothers that received a pot, please let us know how your plant is doing.

I would love to hear ... even if it went to bad-gift-heaven.


New Life for Mid-Century Lamp

It has been a busy and frustrating week - lots of things started but nothing finished. So I thought I would share a little project I did a few weeks ago.


When we bought our house last year, several odds and ends were left by the sellers. The basement had two pretty scary looking items - a plaid sofa bed and...


this charming lamp. Hard to believe that anyone would have bought this.


While learning about Annie Sloan's Chalk Paint,  people suggested practicing on scraps of trim. Since I was thinking about painting glass and some other lamps left in the house, I decided to get crazy and see what I could do.


Still skeptical about non-traditional surfaces, I started by cleaning off years of grime with baby wipes.


I then painted the lamp with ASCP Chateau Gray.


I used a blow dryer to make the paint crackle.


Totally cool result. Looks like really old paint.


After waxing with ASCP Clear Wax, I applied the Dark Wax lightly everywhere and more heavily to the crevices to make them recede.


Wanting to try as many different techniques as possible, I colored some Clear Wax with ASCP Duck Egg Blue. 


I then applied that light blue wax on areas that I wanted to pop out - the little buttons and the raised portions.


On the right side the light is catching the blue and giving it a real glow. On the left side you might be able to see the blue without any additional light - really interesting effect.


I put the lamp in my little temporary setting with yard furniture. Since we will be starting the remodel soon, I have almost no furniture in the house.


I can sit in my bouncy chair and read my gardening book!

For anyone who has read this far ...

 I WILL GIVE  AWAY THE LAMP TO THE FIRST PERSON WHO CONTACTS ME.

Mid-Century Modern is not my style. But if it works for you, let me know. 

We will post in the comments when someone claims it. 


Monday, October 24, 2016

Miniature Victorian Sofa


Several months ago I purchased a small table off the internet. When I went to pick it up, I noticed a really unusual piece of furniture sitting over in a corner. It was a little child-sized sofa that looked to be late 19th century. 

When I asked about the history of the sofa, the gal said she and her roommate had just moved into the house, and the previous tenants had left it. They weren't sure what they were going to do with it. I jokingly told her to call me if they wanted to get rid of it, never expecting to hear from her again.

A couple of weeks later I received a text message saying I could have it for free if I would just come and get it. This is not the first time I have committed to a piece of furniture with only a cursory look and a gut reaction. I went over with the SUV the next day and loaded it up.


When I got it home, I realized it would be a bigger project than I had imagined. It was upholstered in the ugliest fabric I have seen in a while - the red and olive-colored fabric on the arms in this picture. And the bold pattern was wildly asymmetrical. The springs were held in place by a piece of plywood. Sagging and lumpy, the poor thing was obviously in need of major help.

Forgive me for not getting a photo of the original condition. I did not realize I would be writing a blog about it. But let me say, my son thought I was nuts when he saw it. 

I did a little research on small Victorian sofas. Although it is the perfect size for children, I think it was probably a salesman's sample. It is small enough for one man to carry and sturdy enough for an adult to sit on.

I started by stripping the entire thing down to the springs, including: removing the plywood that had been screwed to the underside; pulling millions of tacks that held the hideous fabric in place; and rolling back layers of funky cotton and the original horsehair padding on the seat, back and arms. 


The best tools to use for the job of deconstructing are a flat head screw driver and a pair of diagonal pliers, commonly called dikes by electricians. The wood was so badly damaged by all the tacks used by multiple upholsterers (professional and amateur) that I needed to use wood filler to patch the gaping holes. Today, staples are used by upholsterers, but I only found tacks.


The wood was the dark original stain, scuffed and splintering. But with the beautiful burling, I knew that lightening the stain was my first choice. I used a chemical stripper, a plastic scraper, steel wool, and a toothbrush.


The main wood is probably mahogany and the burling might be walnut. I had done this before and knew how it would turn out. After stripping, the wood has a "dry" look and just needs some wax. I used Minwax Paste Finishing Wax. All the materials for the refinishing came from Home Depot.


I love the details on the back of the sofa!

I did not have to take the orange sofa as far down as this one required. (Those springs and padding had been better maintained.) So how did I know how far to take it? Every layer removed revealed an obvious problem - webbing hanging down, springs falling over and poking through, padding slipping and sagging like an old man's belly.


The arms came completely off when screws were loosened.

I spent days on youtube watching upholstery videos. This one by Kim's Upholstery did the best job of  explaining how to rebuild the guts. 


I bought the new webbing and the web stretcher at JoAnn's Fabrics, along with new batting and upholstery "foam." It wasn't like regular foam and came on rolls in 1" and 2" thicknesses.


 I also bought a package of curved upholstery needles and upholstery thread.

 I had some thick twine I used to re-tie the springs and was surprised that the twine would go through the eye of the needle! Just watch the video above if you need to replace webbing or retie springs.

 On top of the springs I layered burlap, the old horsehair (because I love the feel), the new"foam" and batting. I used the upholstery needle and thread to hand-tie the padding in place. Next I upholstered the piece with fresh muslin...using my new pneumatic stapler. (Say that out loud just for fun!)


The underside of the arm shows the new staples and all the holes left from old tacks.

 The trickiest part of upholstering was matching the pattern since I had selected a toile de jouy for the upholstery. If you are doing your first upholstery project, I recommend a solid fabric to keep things simple. I finished the edges by hot gluing a lovely gimp that echoed the pattern on the toile.


Our friend, Gryff, (short for Gryffindor) heads for the sofa when he visits. He is a miniature dachshund, so this gives you and idea of how small the sofa is. 


I love my toy carriage that is about the same age as the sofa. I will let children sit on the sofa but NOT play with the carriage.


My kitty, Yoshi, likes the carriage.

My dream is to place the sofa in the garden and take picture with my grandchildren - little girls dressed in lacy, princess dresses and little boys clean and combed, wishing they were somewhere else.

If you happen to be in the D.C. area with children, come take pictures with the sofa!

I am serious!!

The sofa will be waiting at the foot of my bed... when I get a bedroom.


Wednesday, October 19, 2016

October in the Garden

A Tale of the Season 

Featuring...


Asters in a fine performance


Costumed in purple, pink and ...


magenta.


Favorite with their bee fans


The Toad Lily

This character actor may not be a box office draw, but always turns in a beautiful performance.


Close-up of Toad Lily


Surprisingly fine performance by an unknown walk-on.


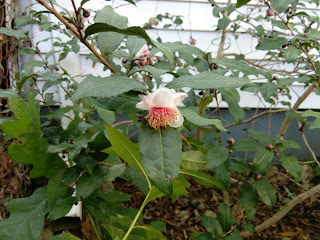
Subdued but lovely performance by fall blooming Camellia.


Cameo role by aging star, Veronica.


This aging star, Butterfly Bush, continues to turn in a solid performance and remains a favorite with its bee fans.


Lack luster performance by Chrysanthemum.


Fine supporting actors include: Leadwort


 and The Sedum, Autumn Joy.


Nice little performance by another unknown.


Strong comic performance by an actor we have not seen before in a serious role, 
The Chinese Lantern Plant


Chinese Lantern with an unknown walk-on.


Rosebud - child actor from a famous family.


Rosebud's family continues to perform and produce large, colorful rose hips. 
(I am not body-shaming here.)


Cinematography is breath-taking with the red berries of this Spirea bush.


And we mustn't miss the posthumous performance of Wild Garlic.
Seed heads add to the texture of the fall garden.


Preview of coming attractions -
 Nandina berries will provide winter color.


But nothing detracts from the performance like a floor littered with popcorn or acorns. I think the squirrels in the balcony are throwing them at me.


This is my view out the window while I type. The squirrel is swishing his tail and chattering up a storm while he eats his acorn. Driving Yoshi, the cat, nuts!